
Scope Mounting
$30.00
Includes bore sighting to get you on
paper with a long gun on the range at 25 yards and with a pistol 15 yards.
Test shots should be seated and from sand bags or equal, off-hand shooting for
sighting in doesn't work. You supply the scope, bases and rings.
$10.00 for bore sighting only.
We have most bases in stock at $5.00 each and $10.00 each for
one-piece mounts.
We have some rings: Millett's and Warne's
For normal scope mounting allow five days to process, for
rush jobs add $10.00 if available
Do it yourself
Okay, you want to save the bucks here's what you need to do to mount your own
scope (well this is what I do):
What you'll need: gun cleaner to remove any oil, torque
wrench, blue loc tite, scope alignment rods, a very good set of gunsmith
screwdrivers (scope mounts have a habit of needing what you don't have so when
you use your automotive screwdrivers you can make a mess of your expensive gun)
gun rest, that should do it.
1) Make sure you've got the correct bases and rings for
your scope! Try to lay it out & make sure the rings aren't going to crunch
into the bell
2) Clean all surfaces on the action where the weapon
has been drilled and tapped;
3) Clean the bases and rings, especially if they're
used (replace old beaters);
4) Mount the bases using blue lock tite. I torque these
to 22 lbs.
5) Now make sure the action works. Sometimes the base
screws will interfere with the action & you'll have to adjust accordingly.
6) Put the base ring on. In order to do this evenly I
start by fully screwing in all windage screws, then I back them out an equal
number of times for each side. Now they should slide over the bases & I
then screw them in at an equal rate on all sides so they cinch at the same
distance. If you don't do this, you'll never get these things right.
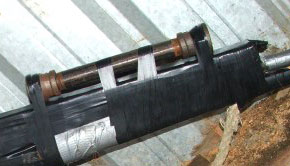
7) Insert the scope alignment rods in both ends of the
rings so that the points meet in the middle of the rings and are almost
touching. They should line up perfectly (or nearly so). If one is
lower than the other you're going to need to shim the low end. You'll need
some shims, try Brownell's.
8) Once you've leveled the rings you're ready to mount
the scope, make sure the crosshairs are centered. To do this wind either
windage or elevation all the way to one end, then reverse it and keep track of
the revolutions (it's usually around 4.5). Now wind it back in the other
direction halfway i.e. if a full wind is 4.5, half would 2 1/4. Repeat
this for windage or elevation. Now the scope is centered.
9) Using some technically controlled method level the
elevation reticle to the gun. I like to attach a level grid to the bases &
then line up the elevation with each level of the grid until it looks perfect.
There are also lasers available for this. I've got one but haven't used it
yet.
10) Using blue loc-tite tighten evenly and alternately each
ring screw. Cinch each screw with a torque wrench 17 to 20 lbs.
Spacing of ring halves should be even. You may have to adjust a few times
to achieve this. Note: Some manufacturers state you don't have to use loc-tite.
You should check.
11) Insert your bore sight tool (either mechanical or laser).
If you can't center the laser to the scope in accordance with the manufacturers
instructions something is wrong. You may have to repeat steps 1-10 to
determine the problem. If you can't get it after a second try, check with
a gunsmith.
12) Once the scope is mounted, always handle the rifle with
"kid gloves." Store the rifle where no one can handle it. Use a hard
case for transport, especially on a big hunt where you're flying in or traveling
great distances. A banged up scope can ruin your hunt if you're not
prepared to deal with it.
13) Sight your rifle in well before you're going to use it.
This way you can discover any problems that could spoil your plans.